Synchronizing Date and Time through SNTP
The device's Simple Network Time Protocol (SNTP) client functionality generates requests and reacts to the resulting responses using the NTP Version 3 protocol definitions (according to RFC 1305). Through these requests and responses, the device (acting as an NTP client), synchronizes its date and time to a time source within the network, thereby eliminating any potential issues should the local clock "drift" during operation. The NTP client follows a simple process in managing system time: 1) the NTP client requests an NTP update, 2) receives an NTP response and then 3) updates the local clock based on an NTP server within the network. The client requests a time update from the user-defined NTP server (IP address or FQDN) at a user-defined update interval. Typically, the update interval is every 24 hours based on when the device was restarted.
You can also configure the device to authenticate and validate NTP messages received from the NTP server. Authentication is done using an authentication key with the MD5 cryptographic hash algorithm. If you enable this feature, the device ignores NTP messages received without authentication.
The following procedure describes how to configure SNTP through the Web interface. For detailed descriptions of the configuration parameters, see NTP and Daylight Saving Time Parameters.
|
➢
|
To configure SNTP through the Web interface: |
|
1.
|
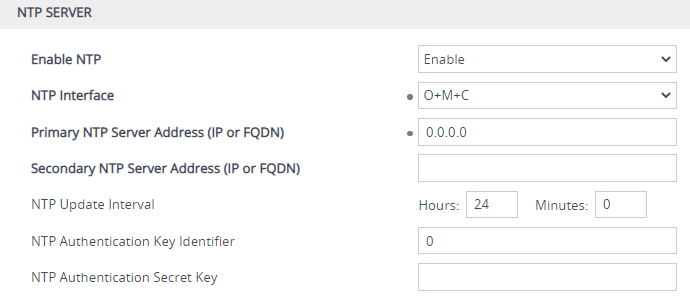
Open the Time & Date page (Setup menu > Administration tab > Time & Date), and then scroll down to the NTP Server group: |
|
2.
|
From the 'Enable NTP' drop-down list, select Enable to enable SNTP. |
|
3.
|
In the 'NTP Interface' field, select an IP Interface from the IP Interfaces table (see Configuring IP Network Interfaces) that you want to use for NTP communication. By default, the IPv4 OAMP interface is assigned. |
|
4.
|
Configure the NTP server address: |
|
●
|
In the 'Primary NTP Server Address' [NTPServerIP] field, configure the primary NTP server's address (IPv4 or IPv6, or FQDN). |
|
●
|
(Optional) In the 'Secondary NTP Server Address' [NTPSecondaryServerIP] field, configure the address of the backup NTP server. |
|
5.
|
In the 'NTP Updated Interval' [NTPUpdateInterval] field, configure the periodic time to synchronize the date and time with the NTP server. |
|
6.
|
Configure NTP message authentication: |
|
●
|
In the 'NTP Authentication Key Identifier' field, configure the NTP authentication key identifier. |
|
●
|
In the 'NTP Authentication Secret Key' field, configure the secret authentication key shared between the device and the NTP server. |
|
8.
|
Verify that the device has received the correct date and time from the NTP server. The date and time is displayed in the 'UTC Time' read-only field under the Time group (see Viewing Date and Time). |
|
●
|
The IP address version (IPv4 or IPv6) of the assigned IP Interface and the NTP server's address must be the same. |
|
●
|
If the device doesn't receive a response from the NTP server, it polls the NTP server for 10 minutes. If there is still no response after this duration, the device declares the NTP server as unavailable and sends the SNMP alarm acNTPServerStatusAlarm. The failed response could be due to incorrect configuration. |
|
●
|
Synchronization by NTP takes highest preference, then by SIP Date header, and only then by PTP. For example, if you enable NTP, the device ignores the SIP Date header and PTP settings. If you do enable multiple synchronization methods, the device sends the SNMP alarm acClockConfigurationAlarm to notify you of this configuration scenario. |